“Peak” Documentation by “onioneye” v1.0
“Peak”
Created: 08/1/2014
By: OnionEye
Thank you for purchasing my theme. If you have any questions that are beyond the scope of this help file, please feel free to open up a ticket at http://onioneye.ticksy.com/, and I will do my utmost to reply in timely fashion.
Table of Contents
- Installation
- Setting up the homepage
- Setting up the blog
- Adding portfolio items
- Custom Menus
- Theme Options
- Plugins & Widgets
- Demo Content
- CSS Files and Structure
- JavaScript
- PSD Files
- Support forum
- Translation
A) Installation - top
To install the Peak theme, you first need to upload the theme files and then activate the theme itself. The theme files can be uploaded in two ways:
- FTP Upload: Unzip the "peak" folder, found in the folder you downloaded from ThemeForest, when you bought the theme. After you are done with that, upload the unzipped folder using your FTP program, such as the popular FileZilla, into the /wp-content/themes/ folder on your server. Once the theme is uploaded, you need to activate it in the Appearance » Themes tab of your WordPress admin panel.
- WordPress Upload: Navigate to Appearance » Themes » Add New » Upload. Once there, select the zipped theme folder (peak.zip), hit "Install Now" and wait for the theme to be uploaded and installed. Once all that is done, click "activate" to activate the theme.
Once you are finished with installing and activating the theme, you will get a notice near the top of the screen, informing you of the plugins that need to be installed in order for the main theme's features to function properly. Please proceed with installing these, and then activating them as well, once the installation is finished. For more information about the plugins used in the theme, read the "Plugins & Widgets" section of this manual.
After dealing with the installation of the theme and the plugins, the best way to proceed is to setup your custom logo, tagline, and other important options, under the Appearance » Customize tab of your WordPress admin panel menu, and then go on to setup your pages, portfolio, and all other features, for which the instructions are provided below.
If you need help installing WordPress, follow this link: http://codex.wordpress.org/Installing_WordPress
B) Setting up the homepage - top
In order to set up the portfolio as your homepage, you first need to make a new page, by navigating to the Pages » Add New tab. Once there, assign a title to the page, while not including any content in the content editor. Select the "Portfolio" template in the "Page Attributes" settings box, and click "Publish".
Once you have made your homepage, navigate to the Settings » Reading tab, where you will find an option called "Front page displays". Select the static page sub-option and choose the page you just created as your front page. You can also have any other page as your homepage, by simply selecting it here, and saving the changes you made.
Your homepage is now created and can be viewed by visiting the page you just published.
C) Setting up the blog - top
If you wish to have a blog page, navigate to the Pages » Add New tab in your WordPress admin panel. Once there, assign a title to the page, while not including any content in the content editor. After you are done with that, click "Publish".
Once you have made your blog page, navigate to the Settings » Reading tab, where you will find an option called "Front page displays". Select the static page sub-option, if it's not selected already, and choose the page you just created as your posts page.
Your blog page is now created and can be viewed by visiting the page you just published.
D) Adding Portfolio Items - top
To add a new portfolio item, navigate to the Portfolio » Add New Item tab. Here you can add images and videos in the content editor, assign categories to the item in the "Portfolio Categories" post option box, and add additional information, such as the description of the item, and the URL of the project. To illustrate that, here is a screenshot of the portfolio edit window:
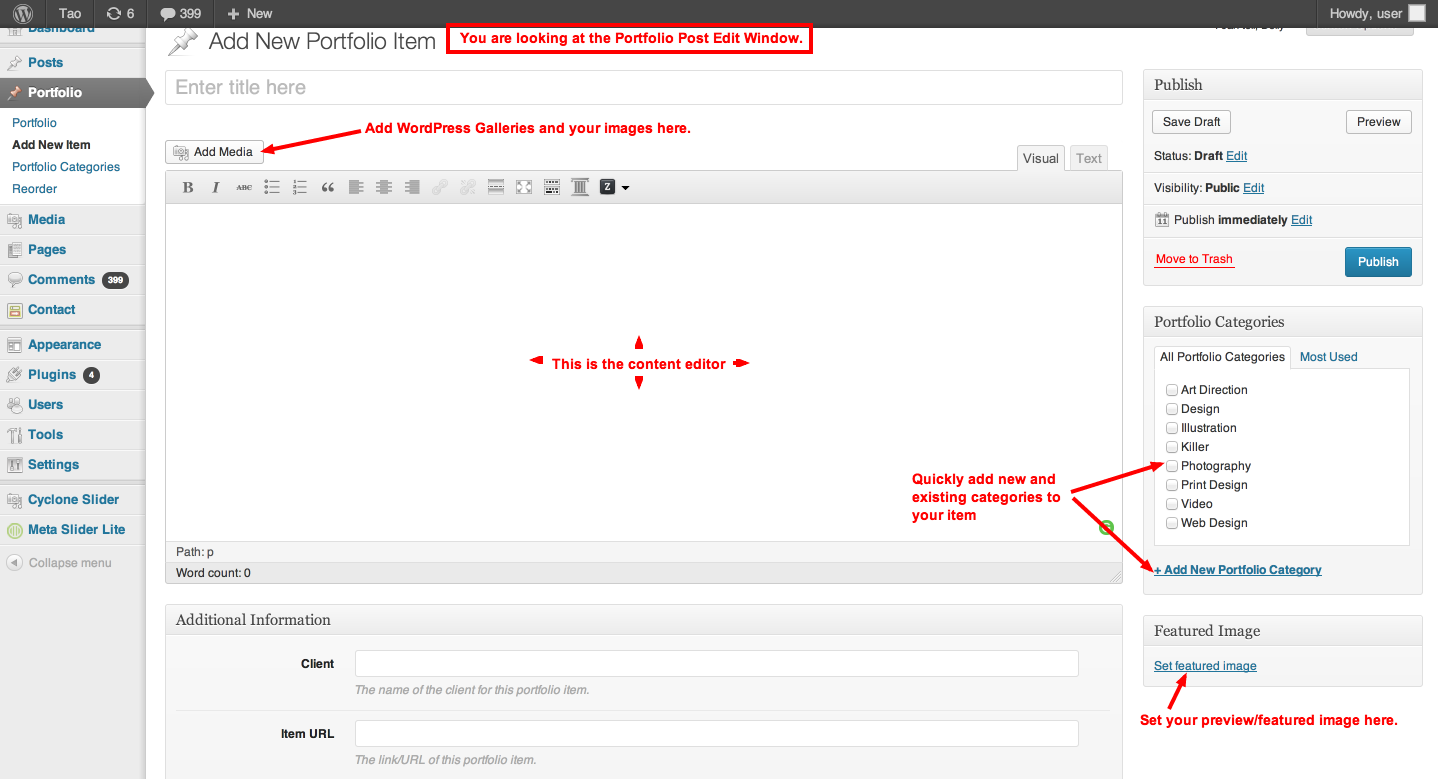
If you wish to categorize the items in your portfolio, you should first create a few categories by navigating to the Portfolio » Portfolio Categories tab in your WordPress admin menu. However, if you do not need to control advanced options such as the slugs of the categories, you can just make the categories straight in the portfolio post edit window, which appears when you are making a new portfolio item, or editing an existing one.
Adding a featured image
Featured images can easily be added via the "Featured Image" settings box, which appears in the portfolio post edit window, as depicted in the screenshot above. Please be aware though that the minimum and recommended dimensions for the featured images are 440 x any height (pixels). If the images are smaller, they will look blurry on retina screens, and the blurriness will be more apparent the smaller the image is.
Adding images in the content of posts (portfolio items)
Content images can be added via the "Add Media" button, which appears directly above the content editor, as depicted in the screenshot above.
Adding images in the slider
The theme uses a very popular and quality slider plugin, named "Meta Slider," which gives you a range of different possibilities for your slideshows. For more information on how to properly utilize it, please refer to the "Plugins & Widgets" section of the documentation.
Displaying your images in the lightbox
The theme utilizes the excellent "Responsive Lightbox" plugin for displaying your images in a beautiful, and highly functional lightbox. It does so for every image, that is linked to its larger version, and that is inserted into the content of the portfolio post. You just have to have the plugin installed, and it will do all the rest for you. For more information on the plugin itself, please refer to the "Plugins & Widgets" section of the documentation.
Adding a WordPress Gallery
To insert a WP Gallery into your content, just go to the post edit window, and click the "Add Media" button. Once that is done, a modal window will display with a "Create Gallery" link, that you can use to create, and insert your gallery in the content of the post.
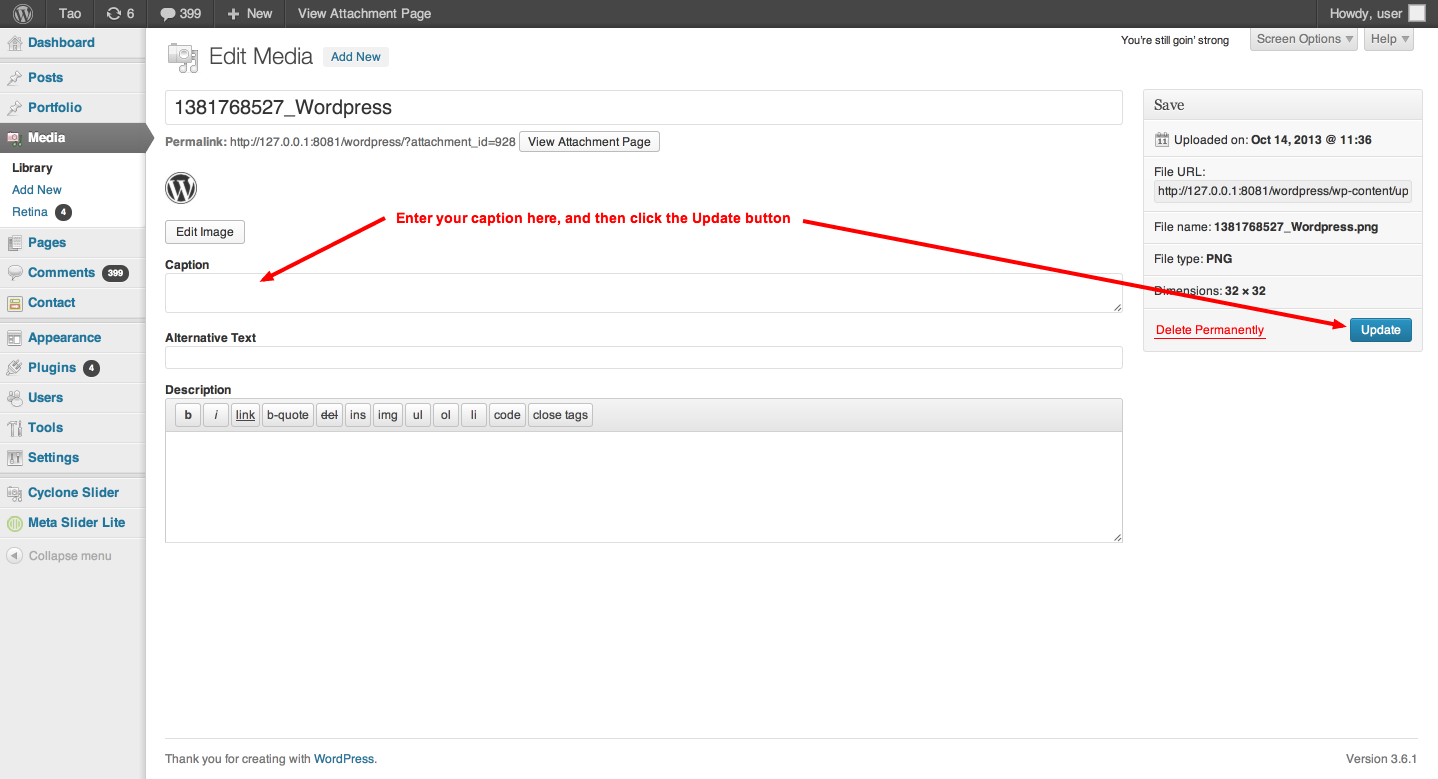
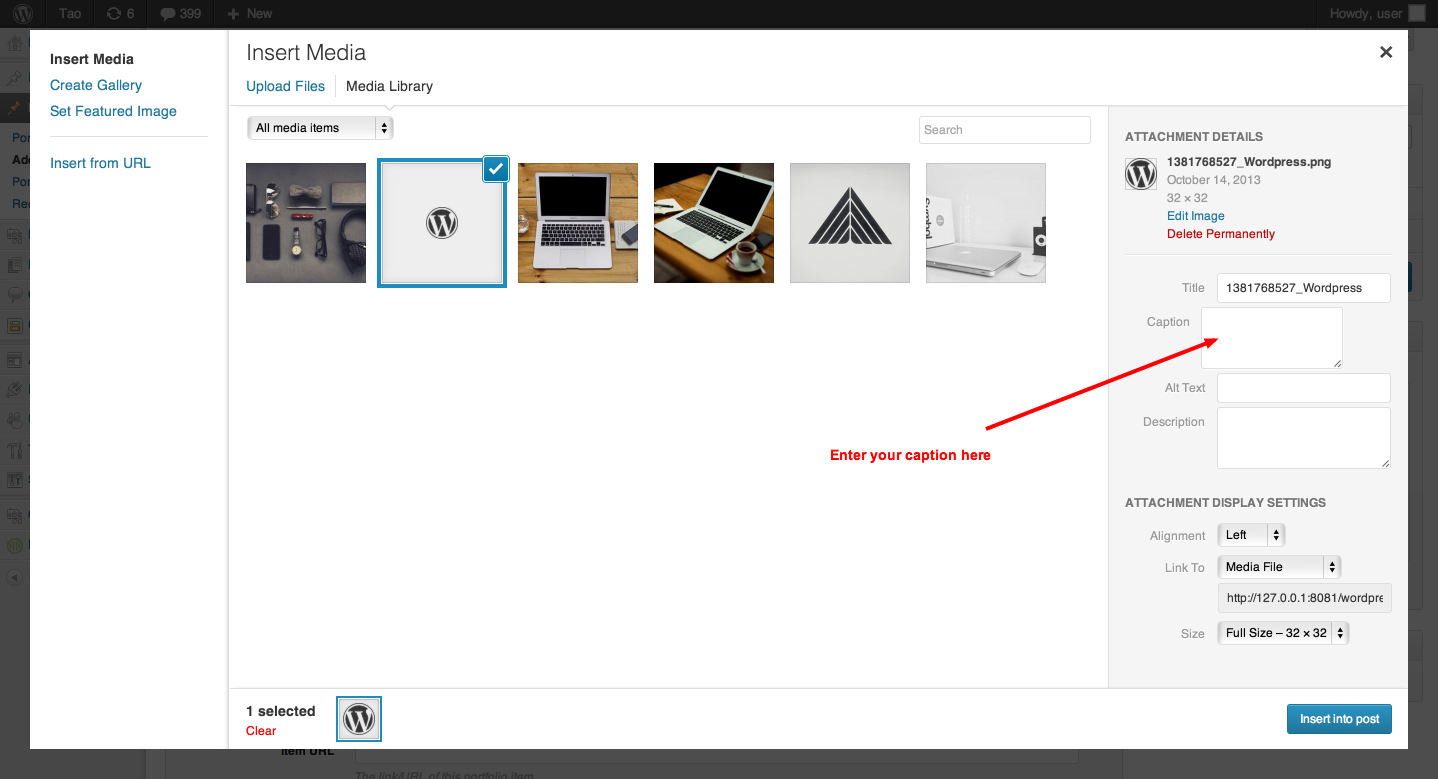
Adding captions to your images
You can easily add captions to your images, by editing the "Caption" fields, under the Media » Library tab of your WordPress admin panel, or in the media uploader modal window. The following are the screenshots, that depict the two mentioned methods:
Adding videos
To add a video, simply copy and paste the provided embed code in the "Text" tab of the content editor. You can add videos from sites such as YouTube and Vimeo, and even have self-hosted videos by utilizing some of the WordPress plugins, made for that purpose.
To find out what sites WordPress enables you to embed from, visit the following link: http://codex.wordpress.org/Embeds#Okay.2C_So_What_Sites_Can_I_Embed_From.3F
E) Custom Menus - top
WordPress’s Navigation Menus feature allows you to create a navigation menu of pages, categories, custom links, tags, etc. that is presented to your visitors. Below is a link to WordPressʼs documentation on their navigation menus feature: http://codex.wordpress.org/Appearance_Menus_SubPanel.
This theme supports one menu, found on the left side of your website (top on mobile), which serves as the site's main navigation.
If you need any further info on the navigation menus feature, please visit the link provided above.
F) Theme Options - top
Your theme comes with a theme options panel, which is packed with a lot of useful options, that let you easily customize the theme, without having to manually change anything in the source files. You can set things such as your custom logo, your contact info, or your social networking links, among other useful things. The options panel is found under the Appearance » Customize tab of your WordPress admin panel menu.
G) Plugins & Widgets - top
The theme utilizes a few “tried and true” plugins to create the slider, lightbox, and drag & drop effects, as well as numerous other important functionalities.
Required plugins
These plugins come packed with the theme files, and are required for the theme to function normally. You are prompted to install them, when the theme is activated. They are the following:
- Portfolio Content—Enables a portfolio post type and taxonomies.
- Portfolio Custom Metaboxes—Enables custom metaboxes for the portfolio post type.
Recommended plugins
- WP Retina 2x—Makes your website look beautiful and smooth on Retina displays. For more information on the plugin, please visit http://wordpress.org/plugins/wp-retina-2x/.
- KC Media Enhancements—Add taxonomy support for media and append custom image sizes to image size selection dropdown. For more information on the plugin, please visit http://wordpress.org/plugins/kc-media-enhancements/.
- WP Easy Columns—Easy Columns provides the shortcodes to create a grid system or magazine style columns for laying out your pages just the way you need them. Using shortcodes for 1/4, 1/2, 1/3, 2/3, 3/4, 1/5, 2/5, and 3/5 columns, you can insert at least thirty unique variations of columns on any page and even in posts. Columns can be added quickly to your pages from the editor with an easy to use "pick n' click" interface. For more information on the plugin, please visit http://wordpress.org/plugins/easy-columns/.
- Responsive Lightbox—Responsive Lightbox allows users to view larger versions of images and galleries in a lightbox (overlay) effect optimized for mobile devices. For more information on the plugin, please visit http://wordpress.org/plugins/responsive-lightbox/.
- Meta Slider—The theme's main slider plugin. Comes with four excellent sliders: Nivo Slider, Flex Slider, Coin Slider and Responsive Slides. For more information on the plugin, please visit http://wordpress.org/plugins/ml-slider/.
Other plugins (Contact form, google maps, twitter...)
- Contact Form 7—Contact form plugin. Simple but flexible. For more information on the plugin, please visit http://wordpress.org/plugins/contact-form-7/.
- MapPress Easy Google Maps—MapPress makes it easy to insert Google Maps in WordPress posts and pages. For more information on the plugin, please visit http://wordpress.org/plugins/mappress-google-maps-for-wordpress/.
- Recent Tweets Widget—Recent Tweets Widget plugin for Twitter API v1.1 with Cache. For more information on the plugin, please visit http://wordpress.org/plugins/recent-tweets-widget/.
- Fast Flickr Widget—Displays Flickr photos in your widget areas. For more information on the plugin, please visit http://wordpress.org/plugins/fast-flickr-widget/.
- Metronet Reorder Posts—Easily reorder your portfolio posts via drag & drop. For more information on the plugin, please visit http://wordpress.org/plugins/metronet-reorder-posts/.
- Captain Favicon—The easiest way to add a Favicon to your site. For more information on the plugin, please visit http://wordpress.org/plugins/captain-favicon/.
- WP Smush.it—Reduce image file sizes and improve performance using the Smush.it API within WordPress. For more information on the plugin, please visit http://wordpress.org/plugins/wp-smushit/.
Widget Areas
Your theme contains two widget areas. They are the following:
- Sidebar Blog—Can be enabled/disabled under the Theme » Customize » Blog Settings tab of your WordPress admin panel.
- Sidebar Pages—Enabled by choosing the "Page with Sidebar" template, under the "Page Attributes" box, which appears when you are making a new page, or editing an existent one.
If you want to have a video or a slideshow in the widget sidebar area, as displayed in the demo, just use the text widget, that is already built into the theme by default in WordPress. All you need to do is to drag the widget to one of the two available widget areas, and then put a link to the video, or a slider shortcode, into the content area of the widget. However, just make sure that the URL is on its own line and not hyperlinked. For example:
Check out this cool video:

http://www.youtube.com/watch?v=nTDNLUzjkpg

That was a cool video.
WordPress will automatically turn that into a YouTube embed when the post is viewed. (Check the “Auto-embeds” check box in Administration > Settings > Media SubPanel.). You can also opt to wrap the URL in the [embed] shortcode. It accomplishes the same effect, but does not require the URL to be on its own line and the “Auto-embeds” setting to be enabled. It also allows you to set a maximum (but not fixed) width and height, like so: [embed width="123" height="456"]...[/embed]
H) Demo Content - top
The demo content can be imported under the Tools » Import » WordPress tab of your admin panel. The demo XML file you need to upload, when you are prompted to do so, can be found on the following link: http://ge.tt/4DZAyjD1/v/0?c
Once you have done this, the content will be imported, but you will need to do a few additional things, to make everything look like in the demo, such as selecting the menu under the Appearance -> Menus tab, and setting up a few options, under the Appearance -> Customize tab of your WordPress admin panel.
I) CSS Files and Structure - top
All CSS files, with the exception of the main stylesheet (style.css) can be found in the theme's /css/ folder.
- style.css—the theme's main stylesheet, which is separated into sections, and which determines the majority of the theme's styling.
- /css/normalize.css—a CSS file that makes browsers render all elements more consistently and in line with modern standards.
- /css/ie9.css—contains the CSS rules, used for setting the default styles for the "Meta Slider" plugin, in the Internet Explorer 9 browser.
J) JavaScript - top
This theme imports the following JavaScript files:
- jQuery
- Modernizr
- Isotope
- prefixfree.min
- jquery.hammer.min
- jquery.fitvids
- jquery.transit.min
- jquery.easing.1.3
- jquery.footer.custom
K) PSD Files - top
Four PSDs are included with this theme. All of them can be found inside the “psd” folder, which is contained in the folder you downloaded from ThemeForest. The following are the names of the psd files and their short descriptions:
- main.psd—contains the theme's most important image elements.
- main_@2x.psd—same as above, but double the size. Meant for retina devices.
- peak-services-page.psd—demo service page.
- peak-clients-page.psd—demo clients page.
L) Support forum - top
If you have any questions that are beyond the scope of this help file, feel free to open up a ticket at http://onioneye.ticksy.com/, and I will do my utmost to reply in timely fashion. Please have in mind that support is not offered via email, twitter, or any means other than the support forum, so only post there, while making sure that you provide a valid purchase code. Also, before asking for help, please take a few moments to familiarize yourself with the terms and conditions of the forum, available on the homepage.
The item purchase code can be found inside the License Certificate. Simply head on over to your Downloads page on ThemeForest, click on the item’s download button, and you’ll be able to grab it. For further instructions on how to obtain the purchase code, please have a look at the screenshot provided below.
M) Translation - top
The easiest way to translate a WordPress theme is to let a plugin do all the heavy lifting for you. That said, the following is the best localization plugin, that will enable you to quickly complete the often cumbersome, and painful process of theme translation: http://wordpress.org/plugins/codestyling-localization/.
Once again, thank you so much for purchasing this theme. As I said at the beginning, I’d be glad to help you if you have any questions relating to this theme. No guarantees, but I’ll do my best to assist. If you have a more general question relating to the themes on ThemeForest, you might consider visiting the forums and asking your question in the “Item Discussion” section.
OnionEye